Getting started with JetBrains Nitra
If you’re more interested in using the HLSL parser that I built for this blog post, and less interested in how I built it, then head over to the HlslParser GitHub repository.
I used Nitra for the first time 3 days ago. I might be and probably am wrong about some of the details. If anyone notices any errors, please let me know in the comments and I’ll update the post. Thanks!
Computer languages and parsers are an area of great interest for me. So when I first heard about the Nitra project from JetBrains, I was intrigued. Over the last weekend, I finally found some time to use Nitra to write a parser for Microsoft’s High Level Shading Language (HLSL). In this post, I will describe my experience with Nitra and how to get started with it, and show a little of what it can do.
But first, if you’re wondering whether to keep reading: this whole post is about computer language parsing. Hopefully you find that as fascinating as I do.
What is Nitra?
A code snippet is worth a thousand words, as they say, so I’ll start with a snippet from a Nitra grammar file:
syntax module HlslGrammar
{
  [StartRule]
  syntax CompilationUnit = TopLevelDeclaration* !Any;

  syntax TopLevelDeclaration
  {
    | Class                  = "class" sm Name sm ":" sm Interface=Name inl "{" ClassMemberDeclaration* d "}" ";";
    | ClassMethodDefinition  = FunctionType sm ClassName=Name "::" Name "(" FunctionParams? ")" Block;
    | CBuffer                = "cbuffer" sm Name RegisterAllocation? nl "{" inl (VariableDeclaration ";" nl)+ d "}" ";"? nl;
    | FunctionDefinition     = Attribute* FunctionType sm Name "(" FunctionParams? ")" (sm ":" sm Semantic=Identifier)? outline_begin_before Block outline_end_before;
    | FunctionDeclaration    = Attribute* FunctionType sm Name "(" FunctionParams? ")" (sm ":" sm Semantic=Identifier)? ";";
    | GeometryShader         = Attribute* "void" sm Name "(" GeometryShaderPrimitiveType sm PrimitiveType=Type InputName=Name "[" NumElements=IntegerLiteral "]" "," sm "inout" StreamOutputObject ")" Block;
    | Interface              = "interface" sm Name inl "{" InterfaceMethodDeclaration* d "}" ";";
    | SamplerState           = "SamplerState" sm Name RegisterAllocation? SamplerStateBody? ";" nl;
    | SamplerComparisonState = "SamplerComparisonState" sm Name RegisterAllocation? SamplerComparisonStateBody? ";" nl;
    | Struct                 = "struct" sm Name nl "{" inl (VariableDeclaration ";" nl)+ d "}" ";" nl;
    | Variable               = VariableDeclaration ";" nl;
  }

  // ...
}
(I’ll go into more detail on Nitra’s grammar syntax a bit later on.)
So what is Nitra? Here’s what JetBrains said in their announcement about Nitra going open source:
Nitra is a language for describing grammars, and the abstract syntax trees to represent them. It is also a build tool to compile the grammars into parsers, and generate the classes required to represent and navigate the AST. And it’s also a set of language services that use the grammar to provide automatic syntax highlighting, outlining and brace matching.
Nitra provides (or in some cases will provide, when it’s officially released) a number of advantages over standard parser generators. It is a parser generator, but it also:
- allows you to extend existing languages using a natural and elegant syntax, and
- provides tooling integrated into Visual Studio to perform syntax highlighting, code folding, static analysis and refactoring (so far, only syntax highlighting and code folding have been implemented)
The DRYness implied by that last point appeals to me; you can define a grammar once, and Nitra will build a parser and VS-integrated tooling for you. I don’t know whether the Nitra team plan to provide tooling for other IDEs and text editors; that would be awesome.
Right now, Nitra generates a parser from a language grammar, and provides syntax highlighting and code folding in Visual Studio based on that grammar, but that’s about it. However, they have an ambitious roadmap, which includes such things as:
- Implement (semi)automatic VS/ReSharper support
- Implement project and solutions support
- Support Nitra driven language files in VS solutions/projects
- Generation of executable images
JetBrains’ investment in Nitra makes sense; most of JetBrains’ products relate in some way to parsing, compiling, refactoring, or in some other way understanding code. They need a tool like Nitra to help them keep moving forwards quickly. But it’s great for the rest of us that they have made Nitra an open source project. If you’ve got any language ideas that you want to play with, give Nitra a try. You can even use the C# grammar as a starting point (if that’s your thing).
For me, I’m just fascinated by compilers and computer languages. (Yes, that makes me great at parties.) I do have some language ideas that I plan to try out using Nitra, but for now, this is just for fun.
Nitra is not, of course, the only parser toolkit in town. To name just a few others: ANTLR, Irony, Sprache, FsLex/FsYacc, Piglet, FParsec. I’ve tried some of them, but I don’t have enough experience with any of them to do a comparison.
Installation
You can find the official installation instructions on the Nitra site, but I’ll repeat them here for clarity.
Before you start, you need to have a recent version of Visual Studio installed. (The recently released Visual Studio 2013 Community will work fine.)
-
Install Nemerle. Grab the Nemerle installer here. At the time of writing (November 2014), the current version is v1.2.404.0, and I installed that into Visual Studio 2013. (Nemerle is a whole topic to itself; it’s a really interesting language that I would love to see getting more attention. It’s a prerequisite for Nitra because Nitra is built in the Nemerle language.)
-
Install Nitra. At the time of writing, you can download the Nitra installer here, but I guess that URL may change in the future.
That’s it for installation. Now, you can go ahead and create a Nitra project.
(I ran into an issue immediately after creating a Nitra project, where compiler errors were referring to an old version of the grammar I was working on. I restarted Visual Studio, and didn’t encounter the problem again.)
Creating a Nitra project
Open Visual Studio, and go to File > New Project. On the left, expand Nemerle and select Nitra. You should see something like this:
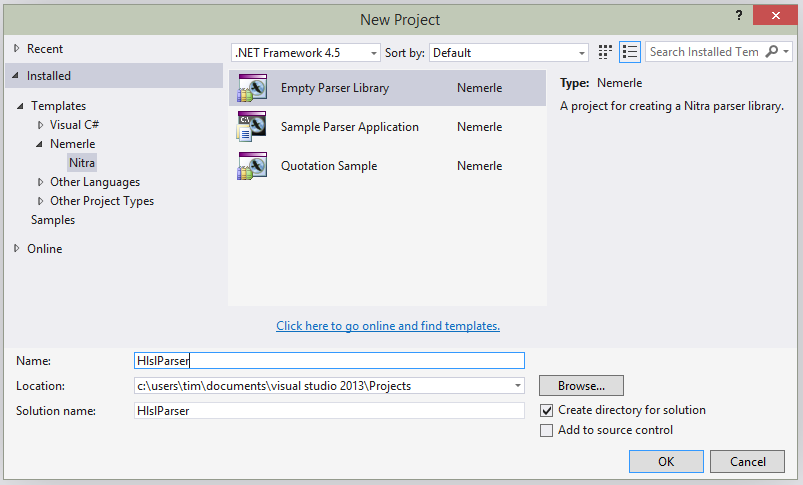
Choose Empty Parser Library, type in a project name, and click OK. That will create a new Nitra project, with a mostly empty syntax module. I renamed the syntax module file to HlslGrammar.nitra.
In the Nitra install directory (C:\Program Files (x86)\JetBrains\Nitra), you’ll find Nitra.Visualizer.exe, a GUI tool that’s supposed to help you build Nitra grammars somewhat interactively. But I didn’t have much luck with it - I tried it with the sample C# grammar and test suite, and it kept crashing. I assume that’s just because Nitra is still in development.
Anyway, I prefer the combination of Visual Studio / ReSharper / NUnit. So I created a new project - HlslParser.Tests - and added the NUnit package from NuGet. I don’t want to tell you how to write your tests, but this test method worked well for me (source here):
[TestCaseSource("GetTestShaders")]
public void CanParseShader(string testFile, string knownGoodFile)
{
  var sourceCode = File.ReadAllText(testFile);

  // Parse test code.
  var sourceSnapshot = new SourceSnapshot(sourceCode);
  var parserHost = new ParserHost();
  var compilationUnit = HlslGrammar.CompilationUnit(sourceSnapshot, parserHost);

  // Check for parse errors.
  if (!compilationUnit.IsSuccess)
  {
    throw new Exception(string.Join(Environment.NewLine,
      compilationUnit.GetErrors().Select(x => string.Format("Line {0}, Col {1}: {2}{3}{4}",
      x.Location.StartLineColumn.Line, x.Location.StartLineColumn.Column, x.Message,
      Environment.NewLine, x.Location.Source.GetSourceLine(x.Location.StartPos).GetText()))));
  }

  Assert.That(compilationUnit.IsSuccess, Is.True);

  // Get pretty-printed version of parse tree.
  var parseTree = compilationUnit.CreateParseTree();
  var parsedCode = parseTree.ToString();

  // Compare pretty-printed parse tree with known good version
  // (if known good version exists).
  if (File.Exists(knownGoodFile))
  {
    var knownGoodCode = File.ReadAllText(knownGoodFile);
    Assert.That(parsedCode, Is.EqualTo(knownGoodCode));
  }
}

private static IEnumerable<TestCaseData> GetTestShaders()
{
  return Directory.GetFiles("Shaders", "*.hlsl", SearchOption.AllDirectories)
    .Select(x => new TestCaseData(x, Path.ChangeExtension(x, ".knowngood")));
}
There are a few things going on there:
-
I’m using NUnit’s
TestCaseSourceattribute, to dynamically build a set of tests based on the return value from theGetTestShaders()method.GetTestShaders(), in turn, looks for all the.hlslfiles in theShadersfolder, and returns them, along with a.knowngoodversion of the each file, which may or may not exist. -
In
CanParseShader, I read the test file into asourceCodestring, and then build two Nitra objects.sourceSnapshotis how Nitra represents source code, andparserHoststores some parser-specific configuration options. Then I callHlslGrammar.CompilationUnit, which corresponds to the “start rule” in my Nitra grammar - I’ll explain start rules shortly. -
If parsing failed, I extract the location in the source file and the surrounding code, so that I can show myself a helpful error message in the test runner console.
-
If parsing succeeded, I create the
parseTreeobject, which is essentially the Abstract Syntax Tree (AST). This is the object you need if you want to do something useful with the code you’ve just parsed. -
For the purposes of this test, all I do with the AST is call
ToString()on it - this internally uses Nitra’s pretty printing feature to spit the AST back out in a form very similar to the original code. We’ll see later how you can include pretty printing directives directly in your grammar. This pretty printing feature is, I think, only really useful for tests like these - it’s easier to compare with a stringified version of the AST than the full AST itself. -
Finally, if there a
.knowngoodversion of the source.hlslfile, then I compare the pretty printed version of the AST with the.knowngoodversion, and check that they match. I only wrote.knowngoodversions of a few of the test files, because I’m lazy. You can see one here - note that there’s less whitespace, and there are no comments. Considering it’s produced from Nitra’s AST, and considering I had to do very little to make it work, it’s a nice feature.
Like I said, you can develop a Nitra grammar any way you want - but I found it helpful to build a test suite of source code files, and run them after each change to the grammar. (Actually, I started with one test file, and gradually uncommented more and more of it as I built the grammar out.)
One thing you’ll find if you’re constantly rebuilding your Nitra grammar and running tests, is that it’s not fast. For my HLSL grammar on my 2-year-old computer, it takes ~20 seconds to compile. There’s obviously a lot going on to convert a grammar into a parser and a set of AST classes, so perhaps this is unavoidable. Other parser generators have non-zero build times too. But any performance improvements in this area would be very noticeable.
Building a Nitra grammar
To explore Nitra, I decided to use it to build a parser for Microsoft’s High Level Shading Language (HLSL), capable of parsing Shader Model 5.0 shaders. It actually turned out to be a pretty reasonable parser in its own right; I might keep developing it, especially when future versions of Nitra are released that make HLSL code completion a possibility.
If you want a simpler example to try out yourself, have a look at the Calculator example in Nitra’s GitHub repo.
The syntax reference on the Nitra website is a very useful resource. You’ll definitely need to refer to it when you’re starting out with Nitra.
Nitra grammars are defined in one or more syntax modules. Here is a syntax module:
namespace HlslParser
{
  syntax module HlslGrammar
  {
    using CStyleComments;
    using Identifiers;
    using Outline;
    using PrettyPrint;
    using StandardSpanClasses;
    using TokenNames;
    using Whitespaces;

    [StartRule]
    syntax CompilationUnit = TopLevelDeclaration* !Any;
  }
}
Nitra’s grammar syntax is highly reminiscent of BNF.
It’s obviously not C# code, but it should still feel familiar to anyone who’s programmed in C#. The syntax module is enclosed in a namespace, and it contains multiple using statements. Those usings pull in syntax modules defined in Nitra.Core. If you’re building a C-like language, then these modules save you having to repeat all the standard stuff - C-style comments, identifier rules, whitespace rules, etc. Since Nitra itself is open source, you can browse the source code for these syntax modules on GitHub.
You can also import your own syntax modules, if you want to split your language grammar into multiple files.
Then comes the first rule: CompilationUnit. It’s decorated with the [StartRule] attribute. This is like the Main method in a .NET console application - it tells Nitra where parsing should begin. The start rule forms the name of the method you should call when you want to parse something. In this case, it’s HlslParser.HlslGrammar.CompilationUnit(...).
Simple rules
Let’s look at how the CompilationUnit rule is defined:
syntax CompilationUnit = TopLevelDeclaration* !Any;
Nitra calls this rule a simple rule. The asterisk after TopLevelDeclaration means “zero or more of the preceding element”. Any is defined in the Whitespaces module, and means “literally any character”. The ! preceding it is Nitra’s Not predicate, and in this case, it ensures that there are no extra characters following the end of the program.
Nitra generates a set of AST classes based on the syntax rules in your grammar. Inside these classes, it generates properties named after the components of each syntax rule. For example, Nitra will generate a CompilationUnit class, with a TopLevelDeclarations property. If you like, you can also set explicit names for AST properties - we’ll see an example of that soon.
Extensible rules
Let’s look at (a simplified version of) the TopLevelDeclaration rule:
syntax TopLevelDeclaration
{
  | FunctionDefinition  = Attribute* FunctionType sm Name "(" FunctionParams? ")" (sm ":" sm Semantic=Identifier)? outline_begin_before Block outline_end_before;
  | FunctionDeclaration = Attribute* FunctionType sm Name "(" FunctionParams? ")" (sm ":" sm Semantic=Identifier)? ";";
  | Struct              = "struct" sm Name nl "{" inl (VariableDeclaration ";" nl)+ d "}" ";" nl;
  | Variable            = VariableDeclaration ";" nl;
}
This is what Nitra calls an extensible rule. You can extend this type of rule in a separate syntax module, even one defined in another assembly.
Each of the items inside the extensible rule are called options. Look at the FunctionDefinition option. It’s designed to match a function definition of this form:
float4 MyPixelShader(float4 t0 : TEXCOORD0, float4 t1 : TEXCOORD1) : SV_Target {
  return float4(1, 0, 0, 1);
}
Still focusing on the FunctionDefinition option, there are a few things to note:
Semantic=Identifiertells Nitra what the corresponding property name in the AST class should be. Without that, Nitra would name itIdentifier2(or something like that; I haven’t actually checked).- Interspersed throughout these grammar rules are “pretty printing” declarations. These are defined in the PrettyPrinting core module, and are only used when converting from the AST back to code, usually for automated testing purposes. Specifically:
sm= space marker. Tells Nitra to leave a space between elements when pretty printing.nl= newline.i= increase indent.d= decrease indent.inl= increase indent and newline.
- You can also see outlining related declarations -
outline_begin_beforeandoutline_begin_end. These are defined in the Outline core module, and are used by Nitra’s Visual Studio extension to implement code folding in the editor.
As an aside - once or twice, I ran into StackOverflowException at runtime. This turned out to be related to a mistake I’d made in the grammar, which meant it was infinitely recursive. Ideally, Nitra could detect this at compile-time, but for now, it’s something to watch out for.
Separately, I also encountered odd runtime errors that turned out to be caused by too-deep nesting. For example:
| Switch = Attribute? "switch" sm "(" Expression ")" nl "{" inl (SwitchLabel+ i Statement+ d)* d "}" nl;
resulted in this runtime exception:
Nemerle.Core.AssertionException : assertion ``rawTreePtr > 0'' failed in file Internal\ParseResult\ParseResult.n, line 268
If instead I broke that subrule out into its own rule, like this:
syntax SwitchSection = SwitchLabel+ i Statement+ d;
...
| Switch = Attribute? "switch" sm "(" Expression ")" nl "{" inl SwitchSection* d "}" nl;
… then everything worked. I think this should be a compile-time, not runtime, error.
Regex rules
From what I can tell, simple rules and extensible rules are the most used in Nitra syntax. But there are other types of rules as well. One type that’s often used for more atomic rules is the regex rule.
regex ScalarType = "bool" | "int" | "uint" | "dword" | "half" | "float" | "double" | "unsigned int";
regex VectorType = ScalarType ['1'..'4'];
regex MatrixType = ScalarType ['1'..'4'] "x" ['1'..'4'];

regex BooleanLiteral = "true" | "false";

regex DecimalDigit = ['0'..'9'];
regex HexDigit = ['0'..'9', 'a'..'f', 'A'..'F'];
regex DecimalIntegerLiteral = DecimalDigit+;
regex HexadecimalIntegerLiteral = ("0x" | "0X") HexDigit+;

[SpanClass(Number)]
regex IntegerLiteral = HexadecimalIntegerLiteral | DecimalIntegerLiteral;
No AST classes are generated for regex rules. Instead, you only get access to the raw text through whatever rule contains it.
Note the SpanClass attribute on the IntegerLiteral rule. That hint is supplied to Nitra’s Visual Studio extension when doing syntax highlighting in the editor. However, for me at least, SpanClass attributes on regex rules don’t seem to work, even though Nitra’s own samples use them. I’m not sure if this is still in development, or you’re just not supposed to use them on regex rules.
Extending tokens
I mentioned earlier that extensible rules can, as the name suggests, be extended. Here’s an example - in fact, you’ll find yourself doing this particular one in pretty much every Nitra grammar you write:
extend token IgnoreToken
{
  | [SpanClass(Comment), ExplicitSpaces] SingleLineComment;
  | [SpanClass(Comment), ExplicitSpaces] MultiLineComment;
}
SingleLineComment and MultiLineComment are defined here. We’re using a shorthand feature - if an option name in an extensible rule matches another rule name, then you don’t need to write | TheRuleName = TheRuleName;. You can just write | TheRuleName;.
The base IgnoreToken is defined like this:
token IgnoreToken
{
  | SpaceToken = Spaces;
}
This extension has the effect of adding SingleLineComment and MultiLineComment options to the existing SpaceToken option.
This is a powerful mechanism - for example, you could start with the C# grammar, and extend it with one or two of your own rules, without having to redefine the whole language just to get to that point (looking at you, Roslyn).
There’s a lot more to Nitra syntax, but hopefully that gives you an overview of what’s available. You can peruse the full HLSL grammar on my GitHub repo for more in-depth examples.
Syntax highlighting and code folding
Once you’ve written your grammar, you can integrate it into Visual Studio. Specifically, you can get syntax highlighting and code folding in the standard Visual Studio editor, for your own language. (There are more VS features planned for the future.)
To do that, you need to:
- Compile your Nitra project, and find the resulting DLL.
- (Optional) Copy the DLL into
C:\Program Files (x86)\JetBrains\Nitra. - Edit
C:\Program Files (x86)\JetBrains\Nitra\NitraGlobalConfig.xml. - Add a new
Languageto theLanguageselement. For example:
<Language Name="HLSL" FileExtensions=".nhlsl" Grammar="HlslParser.HlslGrammar" StartRule="CompilationUnit">
  <Module><![CDATA[$NitraPath\HlslParser.dll]]></Module>
</Language>
And then restart Visual Studio.
I used the .nhlsl extension, so I didn’t mess with Visual Studio’s built-in .hlsl syntax highlighting. Now when I open a .nhlsl file, I see syntax highlighting and code folding. Pretty cool! (As I mentioned earlier, syntax highlighting isn’t working for regex rules, so it’s not quite as “highlighted” as it should be.)
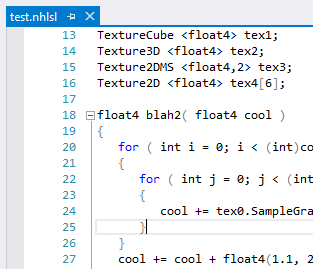
Even better - and this is something that even Visual Studio’s HLSL editor doesn’t offer - I get real-time parse errors highlighted and included in the error list. To be clear - this is real-time, just like ReSharper’s parse errors. You don’t need to compile to see these errors.

It will be so much cooler once it supports code completion…
I hope that there will be an easy to distribute your own grammars to other people’s computers - editing an XML file isn’t ideal in the long term.
Next steps
So, you’ve written your Nitra grammar, and seen some basic Visual Studio integration - now what? You probably want to do something with your language, such as, you know, compile it.
Nitra is still in development, and so far, it only really offers a parser generator, as well as a couple of VS integration points. The back-end parts of the compiler will come later.
As I described earlier, you can invoke the parser by calling your start rule method. Calling CreateParseTree on the object you get back will give you the AST. You can cast the AST object to the type of your start rule, and then navigate through the tree from there, like this:
var parseTree = (HlslGrammarParseTree.CompilationUnit) compilationUnit.CreateParseTree();
var firstDeclaration = parseTree.TopLevelDeclarations[0];
You’ll need to do a lot of casting if you go down that road.
Or you can write a class that inherits from ParseTreeVisitor, and pass it to the Accept method on your AST.
Finally, you can write rule methods directly in your grammar, and these will be added as methods to your AST. The calculator sample does this. I think this is fine for simple parsers, but for more complex languages, this would quickly get out of hand.
Conclusion
Nitra is already an interesting project, and a good way to get a parser up and running. But Milestone 2 on Nitra’s roadmap includes some important features, including a type system and better IDE support. If I really wanted to write a language using Nitra, I’d wait till those features are fully baked before starting. I don’t know how the type system will work, but if it’s as well integrated as other features like syntax highlighting and code folding, then it should be nice to work with.
It would be great if Nitra opens up language development for more people - what if you could define per-project C# language extensions? Obviously, that could easily be abused, but used wisely, it could solve a lot of common pain points (WPF dependency properties / INotifyPropertyChanged implementations spring to mind).
I’m going to be keeping an eye on Nitra - it’s an exciting project, and I’m looking forward to seeing how it turns out.